Tool literacy – EasyBib a powerful tool for citing information

Grade 6 is about to begin their Exhibition research. They were introduced to the electronic citation maker EasyBib

Opening up IBO documents

When the IBO sends you documents, you may encounter issues when opening up the editable PDF files that are linked in the document. The following tutorial should show you how to open these files successfully.

Step 1: Click on the below image to open a sample IBO document.

IBO Forms

Click on image above to download sample IBO document


Step 2: When you click on any of the Internal or External Assessment links and you may encounter this error screen:

Screen Shot 2015-02-18 at 09.14.27

Step 3: Hover over the image and press the old school save to disk icon.

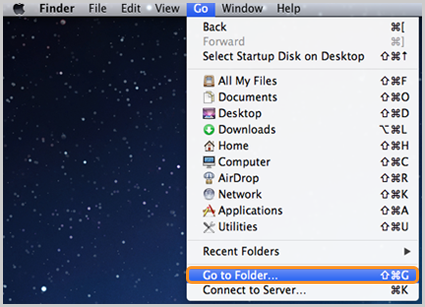
Step 4: Once downloaded, click on the little triangle next to the downloads area and select Show in Finder from the pop up menu. This will locate the downloaded file in the Finder.

Screen Shot 2015-02-18 at 09.01.42

Step 5: After you have located your download, right click on the file and select Open with > from the pop up menu. Then find Adobe Acrobat Pro if you do not have the most current version of Adobe Reader. Either program will work.

Screen Shot 2015-02-18 at 09.04.50

How to tabulate and graph individual student observation data

Here’s how to gather individual data on specific students for reports and reflections on student traits that are exhibited.
Step 1: Click the links below to open your observation results:
Hisar Campus Reports
Step 2. Click on the little triangle at the top of column C and then Sort sheet by A – Z
Inline image 1
Step 3: Find the row that the student you want to identify is on, and click the first row in the gray numbered area and then scroll down to the last row where the child’s name is and hold the shift button to select all the rows in between.
Inline image 2
Step 4: Once you have selected the rows with the individual student data you want. Press Command C to copy the data.
Step 5: On the bottom of the spreadsheet, click the Individual tab. Once there, delete the current data.
 
Inline image 3
 
Step 6: Select row 2 by clicking the gray 2 once and then press Command V to paste your new data.
Step 7: Click on the Data tab and see the automatically tabulated data and graphs to review
Inline image 1

How to organize and print student observations in Early Years

If you are planning on using your observations as a reference in the reports, here’s how to print out the report results.
Step 1: Click the links below to open your observation results:
Hisar Campus Reports
Step 2. Click on the little triangle at the top of column C and then Sort sheet by A – Z
Inline image 1

Step 3: Print by pressing Command P and then mimic the below settings:Current Sheet, Repeat row headers, Paper Size: A4, Fit to Width, Landscape
Inline image 2

Step 4: Once you hit print, it will take you to the Google Chrome print screen, if you’re on a different browser, you should go directly to the correct dialogue box. If on Chrome, please hit the Print using system dialogue 
 
MAKE SURE YOU SELECT LANDSCAPE PRINT ON THE SYSTEM DIALOGUE BOX
 
Inline image 3

Dove Evolution video

https://www.youtube.com/watch?v=iYhCn0jf46U

Transferring Your Cloud

IICS Leaving Procedure – Transferring your Tech

Before you leave IICS, we would like you to safely backup your data and transfer any teacher resources to your HOD or incoming staff accounts.

  1. Google Takeout
  2. Teacher Resource Transfer
  3. Backup Your MacBook
  4. IICS WordPress Site
  5. Final Disconnect

Google Takeout

Google Takeout is a free service from Google that allows you to download files and data stored in your Google account. There are a number of Google services from which you can download your information:by default 2014-06-16 at 15.10.25

The downloaded information can be saved on your computer and then uploaded into another Google account at a later time. Documents downloaded out of Drive will be in Microsoft Office format which can be saved and worked on locally with MS Office or uploaded to a different Google Account and used online in Drive. Similarly, YouTube videos will be downloaded in their highest quality and can be re-uploaded to a different YouTube account.

Quick Steps

(IMPORTANT – You will do the first 4 steps so that Google Takeout will also download files you do not own)

  1. Download Google Drive to your computer
  2. Login to your IICS Gmail account.
  3. Wait for all of your Google Drive items to sync. COPY & PASTE everything you want to download and take with you into one folder called “_DOWNLOADS”
  4. Wait until this finishes copying AND uploading to your Drive.
  5. Go to Google Takeout website.
  6. Choose Create Archive.
  7. We suggest choosing the following:
    1. Drive (All files stored in Drive, ie. docs, spreadsheets etc.)
    2. YouTube (all movies uploaded to YouTube)
    3. Email
    4. Bookmarks
  8. After this you will be guided by on-screen instructions depending upon which items you chose to download
TOP

Teacher Resource Transfer

Now that you have downloaded an archive of your data, it’s important to make sure that any teacher resource is organized into relevant folders and that the ownership of the files and folders are transferred to either your HOD or the account of the incoming teacher. The process takes a few minutes, and is made easier if you have created folders to organize your Drive with some simple Drive search techniques.

Note: You can only change ownership to other IICS accounts and your documents will be inaccessible after you leave for the Summer.

Quick Steps
YouTube Tutorial

  • Review folders that you own that have been shared with others.
  • Select the folder and change the Sharing settings.
  • Make another person the Owner of the folder (HOD or Incoming Teacher). If the account is not already on the sharing list you will have to add it first as an Editor, save and then change to Owner.
  • Changes will NOT propagate down to the documents and subfolders.
  • Repeat steps to change ownership for any individual documents.
  • Search for files that are “Owned by me”.
  • Review and change ownership as needed.
TOP

Backup your MacBook

You will need to decide what data is on your laptop that you need to take with you. You may wish to copy all of your documents, music, videos and whatever else you are storing on your laptop. The best way to do this is to transfer your files to another device using an external hard drive. You have three options:

  • TimeMachine: When you connet your external hard drive, your Mac should ask you if you’d like to use this as a Time Machine. Use this to backup all of your data and user settings for your next computer. Here’s a tutorial on how to use TimeMachine
  • External Hard Drive (manual) You can simply plug in a hard drive and manually drag and drop the files and folders from your laptop to the hard drive but be warned, don’t forget about small files like bookmarks, or large files like music, photos and videos.
  • Cloud Storage If you have personal cloud storage accounts, you may choose to add them to your MacBook and back up your files that way. This may take a bit longer, but you will have the comfort of having access to your files from any device. This is the best option if you do not yet have another personal computer or an external drive.
TOP

Exporting Your WordPress (Class) Site

WordPress Tutorial Your WordPress (Class) Site can be transferred to a personal WordPress.com account. You need to export your blog and then import into another WordPress Domain.

Quick Steps

  • Log in to your blog.
  • Go to Tools >> Export
  • Save the XML file.
  • Create a new account on WordPress.com (or create your own domain and add WordPress).
  • Upload your XML file to your new domain.
TOP

Final Disconnect

After you have saved and organized everything, you will want to disconnect any cloud sharing tools, like iTunes, Google Drive, Google Chrome, Dropbox, and Box.com.  The following section shows you how to do this.

iTunes Deauthorization Apple only allows 5 computers to access your iTunes library. To ensure that your current school-issued computer is not included in the five, de-authorize your school-issued computer.

  • Go to iTunes
  • Click on Store
  • Click on De-Authorize This Computer

Google Drive

To sign out of Google Chrome, go to SettingsSign inDisconnect your Google Account.

1

2


Google Chrome

3


Dropbox

  1. Click on the Dropbox icon from the menu bar.

    The Dropbox icon on the menu bar
  2. Click on the gear icon and select Preferences… from the menu.
  3. Select the Account tab. (Dropbox for Business users: If you have connected your personal and work Dropboxes, you’ll also need to select the specific Dropbox you want to unlink.)
  4. Click on Unlink This Dropbox… and confirm your choice.
Unlink button from Dropbox preferences
Unlink button in the desktop application

Box.com

4
5

Skype

When you sign in to Skype, your Skype Name is added to the drop-down list in the sign-in screen.

Skype Name selected from the drop down list in the sign-in screen

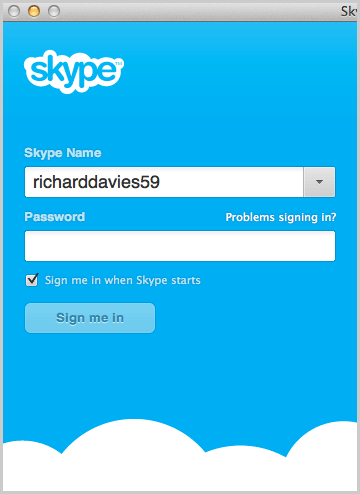
To remove your Skype Name from the Skype sign-in screen:

  1. Quit Skype.
  2. Open Finder.
  3. In the menu bar, click Go > Go To Folder….
    The Go to Folder option selected under Go in the menu bar
  4. Type ~/Library/Application Support/Skype into the dialog box that appears and click Go.
    ~/Library/Application Support/Skype typed into the dialog boxImportant: Make sure that you include the ~ sign at the beginning of the path as it indicates the user folder. Using the path without this sign navigates you to the general system folder that doesn’t include the Skype folder.
  1. Locate the folder named after the Skype Name you wish to remove from the Skype sign-in screen, and move it to trash.

When you restart Skype, your Skype Name will no longer be displayed.

Remove Information from Browsers

Chrome

2014 06 17 at 11.06 AM.png

Open your browser and click the hamburger menu in the upper right corner.  Older versions of Chrome have a gears or wrench icon instead.

Step 2   Delete Chrome Cookies.png

Click Tools > Clear Browsing Data from the dropdown list.

Step 3 Delete cookie timeframe.png

Select the timeframe you want to delete. Check all, select the beginning of time.

Click “Clear Browsing Data”

Firefox

Open the Firefox – Go to Preferences

by default 2014-06-25 at 14.32.25

Click “Clear your recent history”

by default 2014-06-25 at 14.32.35

Select everything and press “Clear Now”

by default 2014-06-25 at 14.32.47


TOP
Adapted, with permission, from Yokohama International School, 12 June 2014